Back
Close
  • 4

Learning Opportunities

This puzzle can be solved using the following concepts. Practice using these concepts and improve your skills.

Statement

  The Goal

After months of struggling, little Jimmy finally solved the Tetrasticks puzzle. Frustrated with how tricky it was, he started gluing the pieces to the game board. But just as he was in the middle of it, he opened a window and went to the bathroom. Suddenly, a gust of wind blew in, knocking the board to the floor! Now, only the glued pieces remain in place, while the rest are scattered.

You must quickly restore the puzzle before Jimmy notices, or he'll throw a fit again! Carefully place the missing pieces to fill the board, making sure everything fits perfectly.

  Rules

You will be given the description of a board, that has to be entirely covered using the available tetrasticks.

  • each tetrastick is composed of 4 line segments
  • tetrasticks can share the same intersection but can't cross each other
  • tetrasticks can be flipped horizontally
  • and/or rotated by 0°, 90°, 180°, or 270°
  • below is an overview of all 16 tetrasticks used in the puzzle with their respective IDs, partially resembling their shapes
Fig 1 : Visual representation of tetrasticks (no flip + no rotation)

Your task is to fill a 5×5 board of squares or, more precisely, a 6×6 grid of edges using the provided tetrasticks. Some tetrasticks may already be glued to the board, so pay close attention to the input.

Each turn, you must place one tetrastick on the board. To do so, you need to specify:

  • The ID of the tetrastick you want to place.
  • Whether you want to flip it horizontally.
  • The number of times you want to rotate it clockwise.
  • The row and column where you want to place it.

Make sure all pieces fit correctly within the grid!
Fig 2 : Red circle marks correctly shared intersection; red cross incorrect

  Example

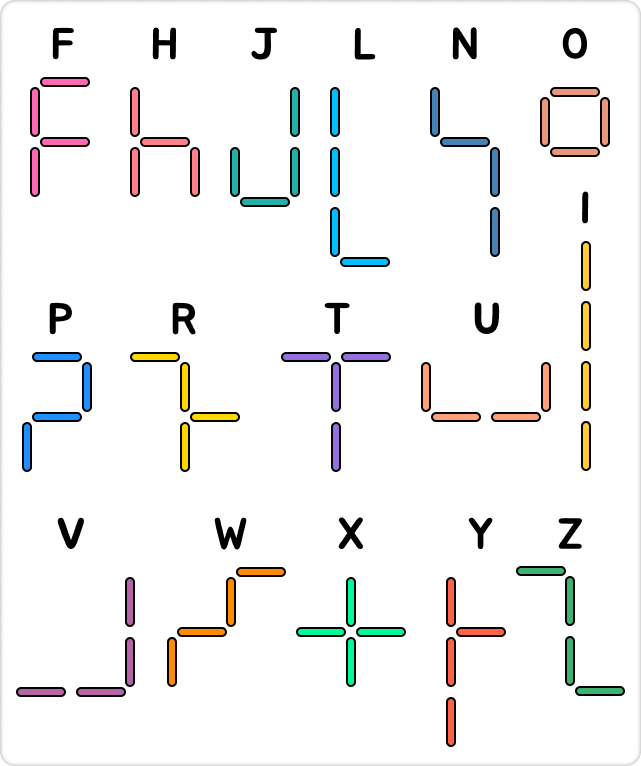
The R tetrastick as shown in Fig 2, requires you to flip it horizontally (flip = 1) and rotate it twice (rotate = 2):

Fig 3 : Tetrastick transformation

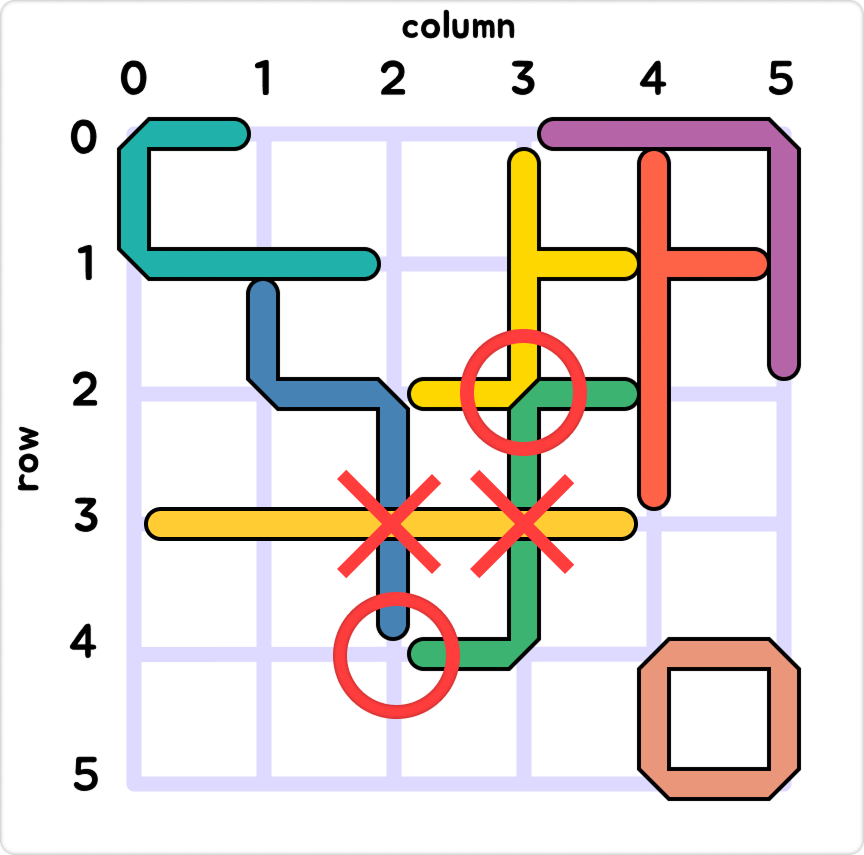
The bounding box of this tetrastick is 2×2. The row and column values represent the position of the top-left corner of the bounding box. In the example above, that would be row = 0 and column = 2.

A tetrastick placement is described using its id, flip, rotate, row and column separated by space. For example: R 1 2 0 2

At the beginning of each turn, you will receive a complete description of the board, which consists of the placement descriptions of all already placed tetrasticks. At the end of your turn, you must output the placement description of a single tetrastick.

  Additional Info

Background image from Freepik.com
Source code in my GitHub repo
Have a look at this great tutorial on Algorithm X by Timinator

  Game Input

Input

Every turn you will receive current configuration in following format:

Line 1: number m representing amount of remaining tetrasticks to place

Line 2: m space separated IDs of remaining tetrasticks

Line 3: number n representing amount of tetrasticks already placed on board

Following n lines: already placed tetrasticks as described in the example. For example: R 1 2 0 2 (id, flip, rotate, row, column)

Output

1 Line: 5 Space separated values id, flip, rotations, row, column

id of tetrastick
flip 1 if tetrastick should be flipped horizontally, 0 otherwise
rotations from interval <0 ; 3> - count of clockwise rotations
row from interval <0 ; 5> - vertical placement
column from interval <0 ; 5> - horizontal placement
For example H 1 2 0 3 will flip (1) horizontally h-shaped tetrastick (H) and rotate it 2 times clockwise. After that the tetrastick will be placed on 0th row and 3rd column.
Constraints

Allotted response time to output is ≤ 5s in first turn and 50ms in remaining turns

A higher resolution is required to access the IDE